


- Introduction
- 1. Prayer
- 2. Bhastrika Kriyas
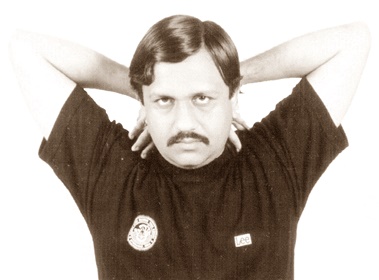
- 3. Head / Skull exercises
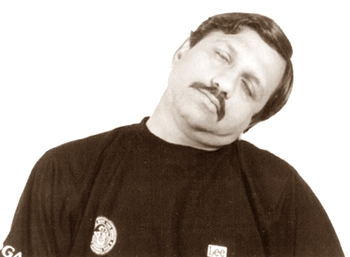
- 4. Kriya to reduce Tension
- 5. Eye exercises
- 6. Nose and Jaws Exercises
- 7. Mouth Exercise
- 8. Teeth and Cheeks Exercise
- 9. Hearing Capacity development
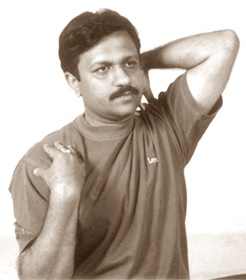
- 10. Neck Strengthening exercises
- 11. Throat Nerves exercises
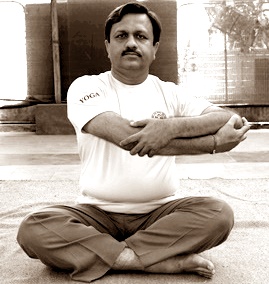
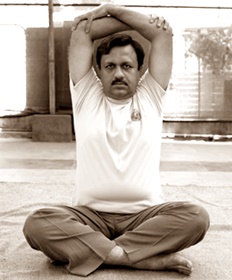
- 12. Arms Exercises
- 13. Auto Accupressure
- 14. Chest, Heart and Lungs exercises
- 15. Stomach exercise
- 16. Back and Waist exercises
Micro Yoga exercises are independent in nature. People of every age can practice these exercises and get benefited. They provide good exercise to the organs as a result, the efficiency of functioning of the organs increases and man feels energized. These exercises can be comfortably practiced within 20-30 minutes during which entire body is relaxed and recharged.
Maintenance of health is the assumed result of micro Yoga practice. Before practicing any Yogasanas or other physical exercises, micro Yoga should be practiced as a warming up process.
Late Swamy Dheerendra Brahmachary researched and formulated a syllabus and popularised it all over the world. Veteran Yogasanacharya Revered Deekshitulu studied this set of exercises and then trained thousands of people in A.P. After further research at Gandhi Gyan Mandir Yoga Kendra earlier syllabus of Sukshma Yoga was modified and since 1987 onwards the following program is being taught to the aspirants.
We observe that, this systematic concept is creating a revolution in the health conscious people all over the world.
Micro Yoga can he practiced in sitting position either on the floor on a spread carpet or a chair. As these are very subtle exercises they need lot of awareness and total concentration for full fledged benefits. For whichever part of the body the process is done, the mind should be focussed on movement of that part only.
Each small process may be done for 15-60 seconds as per the capacity.
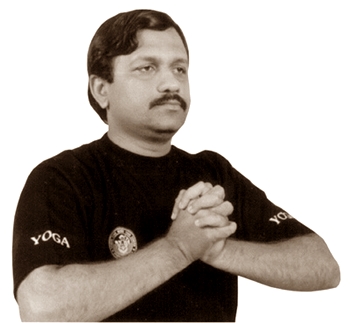
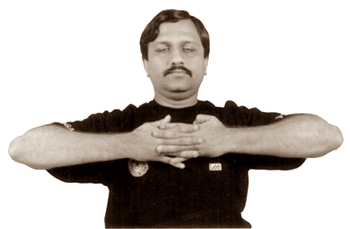
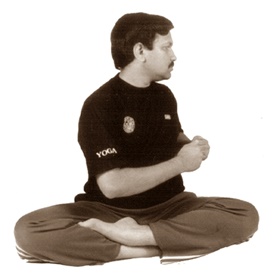
1. PRAYER:
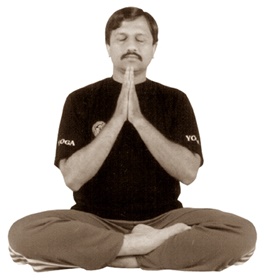
Procedure:
Sit in a comfortable posture preferably Sukhasan with hands folded. Join both palms with the thumbs touching the pit in the throat. Take a deep breath in and breath out with a calm mind. Chant the prayer.
Advantages:
It helps in purification of thoughts, concentration of mind increases. Helps in developing patience and the wavering of mind reduces.
2. BHASTRIKA KRIYAS:
These kriyas help in reducing the impurities of the body through the process of forceful breathing.
Awareness:
On the movement of stomach/ chest.
Note: While breathing in expand the chest and stomach and contract while breathing out.
1) Bhastrika:
Procedure:
Breathe in and breathe out through both the nostrils in quick successions.
2) Chandrang Bhastrika:
Procedure:
Close the right nostril with the help of right thumb. Breathe in and breathe out through the left nostril in quick successions.
3) Suryang Bhastrika:
Procedure:
Close the left nostril with the help of right ring finger. Breathe in and breathe out through the right nostril in quick successions.
4) Sushumna Bhastrika:
Procedure:
Alternatively changing the nostrils breathe out and breathe in in quick successions.
Advantages:
It helps in eliminating the impurities of the abdominal and chest areas and especially the lungs.
3. EXERCISES FOR THE HEAD / SKULL:
Note: While performing these kriyas, do not allow the breathe to go below the throat.
1) Throat-Vocal cord Kanth shudhi:
Keep the back and head straight. Touch the pit of the throat gently with the index finger. Take a deep breathe in, breath out and in, in quick successions.
Awareness:
The pit of the throat.
Advantages:
Clarity of voice develops.
2) To increase will power:
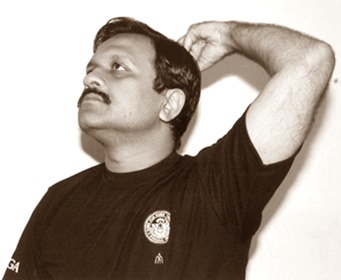
Procedure:
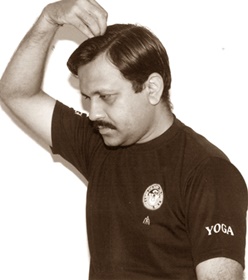
Keeping the backbone straight, tilt the head backwards. Gently tap the back of the skull using all 5 fingers. Take a deep breath in and then breathe out, breathe in, in quick successions.
Awareness:
The back of the skull (Shikha mandal)
Advantages:
This helps in increasing the will power and reducing fear.
3) Kriya to develop memory:
Procedure:
Keeping the backbone straight, head should be half bent in the front. Gently tap the top of the head using all the 5 fingers. Take a deep breath in and then breathe out and breathe in, in quick successions.
Awareness:
Top of the head
Advantages:
It helps in improving memory power.
4) Kriya for development of intelligence/ thinking capacity:
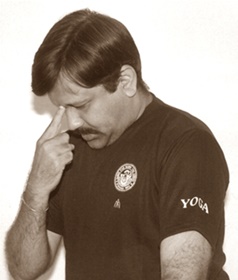
Procedure:
Keep the backbone straight. Bend the head foreward and touch the chin to the chest. Touch the center of eyebrows with the index finger. Take a deep breath in and then breathe out and breathe in, in quick successions.
Awareness:
Center of the eyebrows
Advantages:
Development of intelligence / thinking capacity.
Note: Each Kriya can be practiced 3 – 4 times While performing the kriyas eyes should be closed for better concentration.
4. KRIYA TO REDUCE TENSION:
Procedure:
Raise the eyebrows, so that folds/wrinkles are formed on the forehead. Eyes should be open. Be in this position for 5 seconds. Come to the normal position and close the eyes. Repeat the kriya 4 – 5 times.
Awareness:
Forehead
Advantages:
This reduces tension
Note:
Breathing should be normal
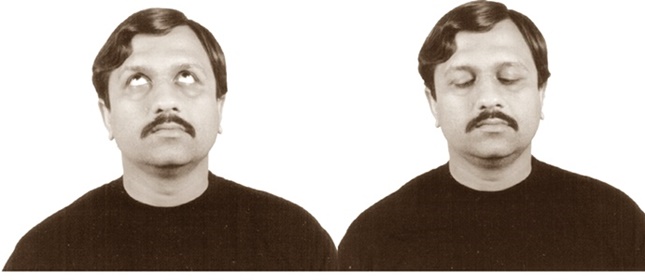
5. EYE EXERCISES:
In all the eye activities, breathing should be normal. During this practice, eyes should not be exposed to direct sunlight or any bright lights.
There are 3 types of eye exercises:
a. Exercises to relax the eyes
b. Exercises to improve eyesight
c. Exercises to control the movement of the eyes
a) Exercises to relax the eyes:
In the following exercises eye balls are moved quickly to look at alternate thumbs, keeping the fist closed.
Procedure:
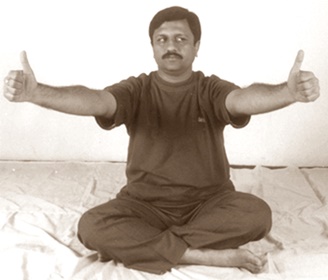
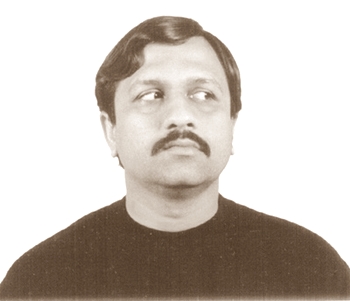
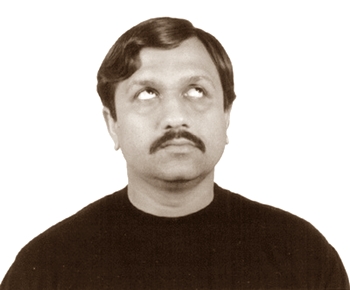
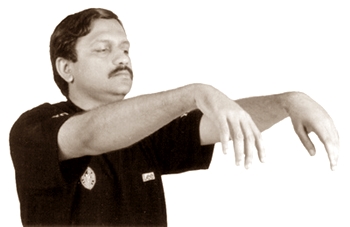
1) Stretch the arms apart in the front with the thumbs raised. Look at both the thumbs alternatively in quick succession.
2) Raise the right arm on top of right side and the left arm downwards on left side. Look at both the thumbs alternately in quick succession (cross movement of eye balls).
3) Repeat the above with left arm raised on left side and right arm downwards on right side.
4) Stretch both arms in the front. Raise one arm upwards and the other downwards. Look at both the thumbs alternately in quick succession (up and down movement of eye balls).
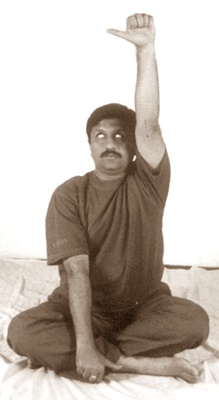
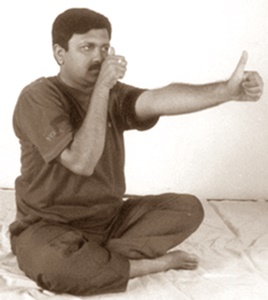
5) One thumb is positioned in front of the center of the eyebrows, near the tip of the nose. Another thumb is positioned in front by stretching the hand straight. Look at both the thumbs alternately in quick succession.
6) Stretch the right arm on to the right side. Looking at the thumb, quickly rotate the arm in anti clock wise direction, without bending the elbow.
7) Repeat (6) with left arm, moving quickly in clock wise direction.
8) Blink the eyes quickly.
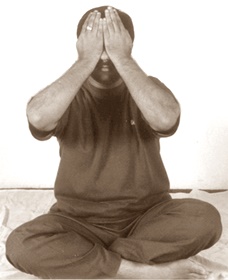
9) Rub the palms and gently massage the eyes with warm palms.
10) Rub the palms again. Place the warm palms on the closed eyes. This is called palming.
Note: Back bone and head should be straight and only eye balls should be moved.
After every kriya eyes should be closed for few seconds to relax them.
b) Exercises to improve eyesight:
These kriyas are practiced slowly repeating each movement 5 to 6 times. In all the following kriyas, both eyes should be continously focussed on the slowly moving thumbs. Eyes should not be blinked or closed as long as possible. After good practice, the kriyas can even be done without using the thumbs.
Procedure:
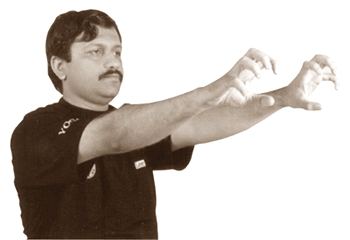
1) Stretch the right arm towards the right side with the thumb pointing upwards. Looking at the thumb, gradually move the arm towards the front. Again, looking at the thumb move back the arm to its position without bending the elbow.
2) Repeat the above with left arm stretching towards the left side.
3) Raise the right arm on top of right side with the thumb pointing upwards, slowly move the right arm towards the ground level of the left side. Gradually, move the arm back to its position without bending the elbow.
4) Repeat the above with left arm raised making a diagonal movement towards ground level of the right side.
5) Both the arms are raised up with the thumbs together pointing upwards. Gradually lower both the arms to ground level without bending the elbows. The arms are again taken back to their position. Look at the moving thumbs.
6) Stretch the right arm on to the right side, with the thumb pointing upwards. Looking at the thumb, gradually rotate the arm in anti-clock wise direction without bending the elbow.
7) Repeat the above with left arm, moving slowly in clock wise direction.
8) Blink the eyes quickly.
9) Rub the palms and massage the closed eyes.
10) Do palming with warm palms.
Note: Backbone and head should be straight and only eyes should be moved. After every Kriya, eyes should be closed for few seconds to relax them.
c) Exercises to control the movement of the eyes and develop concentration:
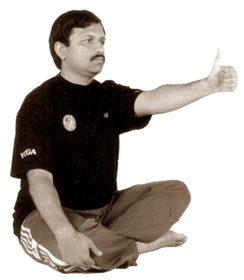
These are known as Traatak Kriyas.
Procedure:
In these Kriyas, thumb is placed at 10 different positions and gazed constantly till the eyes are tired. According to ones capacity, these Kriyas can be done from 15 seconds to 2 minutes each.
1) Stretch one arm in the front with the thumb pointing upwards at the nose level. Look at it constantly.
2) Stretch the arm in the front with the thumb pointing sidewards. Now raise the hand up. Look at the thumb constantly.
3) Stretch the arm in the front with the thumb pointing upwards now lower the hand to the ground level. Look at the thumb constantly.
4) Raise the right arm up on right side with the thumb pointing upwards. Look at the thumb constantly.
5) Raise the right arm to the nose level onto the right side with the thumb pointing upwards. Look at the thumb constantly.
6) Lower the right arm down to ground level onto the right side with the thumb pointing upwards. Look at the thumb constantly.
7) Repeat (4) with left arm.
8) Repeat (5) with left arm.
9) Repeat (6) with left arm.
10) Place one thumb at the center of the eyebrows near the tip of the nose. Look at the thumb constantly.
11) After performing the above ten exercises, a lit candle or a lamp is placed on a table. Look at the flame constantly.
12) After practicing the above exercises, eyes become tired. In order to relax them, the eyes are blinked quickly.
13) Rub your palms to each other and massage the eyes and face with warm palms and fingers.
14) Do palming with warm palms.
15) Eyes are washed with the help of the eye cleaning cups.
Note: Backbone and head should be straight and eyes should not move in the above exercises.
After every Kriya, eyes should be closed for few second to relax them.
Advantages:
By practicing the above Kriyas, blood circulation in eye region is regulated and the eye sight is improved. Burning of eyes, water coming from eyes, dry eyes, weak eyes and other eye problems are solved. These Kriyas also help in reducing eye sight= numbers. Concentration of mind increases. Especially those who use computer or see TV for long time, must do the above daily.
6. EXERCISES FOR NOSE AND JAWS:
Procedure:
1) Keep the mouth closed. Move the lower jaw towards left and right side 8 to 10 times, holding for one second on either side.
2) Keep the mouth closed. Move the jaw in upwards and downwards direction 8 to 10 times.
3) Keeping the mouth closed, nose, mouth, jaws and chin are rotated in a clock wise and anti clock wise direction. Repeat this Kriya for 5 – 6 times.
4) Inhale through mouth, make a ball of air in the mouth. Chew this air for few seconds and exhale through the mouth. Repeat for 5 – 6 times.
Advantages:
Breathing becomes easier, nose becomes shapy. Jaws are relaxed, chewing the food becomes easier. Pimples and wrinkles are prevented / eleminated. Face looks younger.
Note: All the above exercises are humourous and even small children will enjoy to do them.
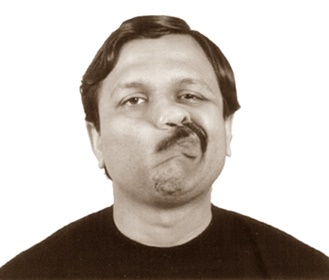
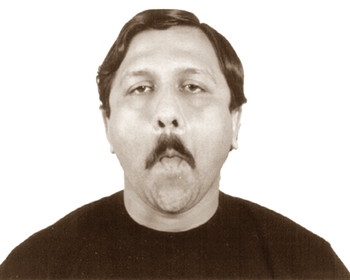
7. EXERCISE FOR MOUTH:
Procedure:
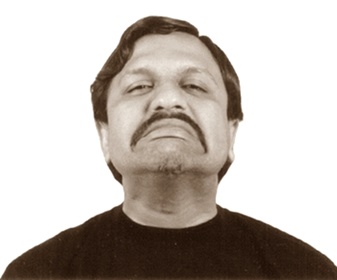
Raise the head, stretch the tongue out and fold like a spoon. Inhale through the mouth. Keep the mouth and eyes closed. Cheeks are bulged. Fill the mouth with air and lower the head. After few seconds again raise the head and release the air through the nose. Repeat this for 4 – 5 times.
Advantages:
This exercise helps in keeping the mouth fresh. It purifies the bad breath. Oral ulcers are cured, pimples are eliminated.
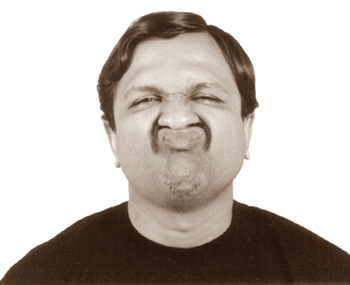
8. EXERCISE FOR TEETH AND CHEEKS:
Procedure:
This exercise is an extension of the above exercise. While breathing in, close both the nostrils with the thumbs with fingers joined. Bulge the cheeks to its maximum and repeat as above (No.7). Let the air in mouth forcefully penetrate in between the teeth. Repeat 4-5 times.
Advantages:
Teeth get strengthened. Teeth related problems like bad breath, pyrrohoea, bleeding gums, tooth ache and other problems are reduced. Extra accumulated fat on the cheeks is reduced. The face is beautified.
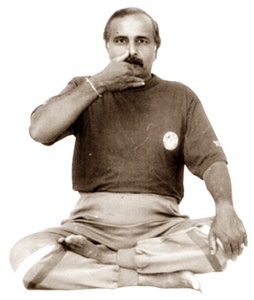
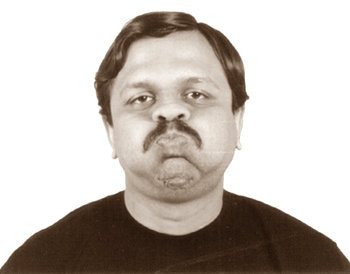
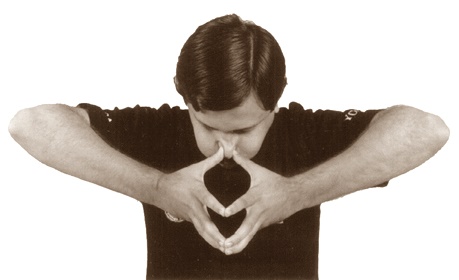
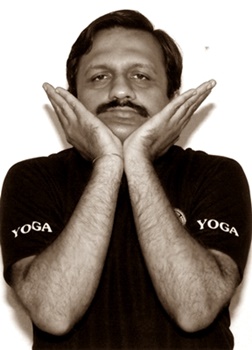
9. EXERCISES FOR DEVELOPMENT OF HEARING CAPACITY:
Procedure:
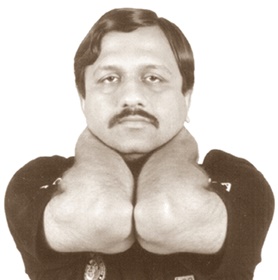
1) This exercise is a further extension of the above exercise. While breathing in, close both the ears with both the thumbs, both the eyes with fore-fingers and both the nostrils with middle fingers. Bulge the cheeks to its maximum and repeat as above (No. 7). Now with mouth, nose, eyes and ears fully closed, try to breathe out with force towards ears from inside. Holding this position comfortably as long as possible, slowly lift the head and breathe out through nose. Keeping the thumbs continuously blocking the ears, repeat 4-5 times.
2) Massage the ears gently downwards and also outwards.

Advantages:
Hearing capacity develops. Deafness is prevented. Bleeding and other oozings from ears is controlled. One can hear Divine sound by regular practice. Life span increases.
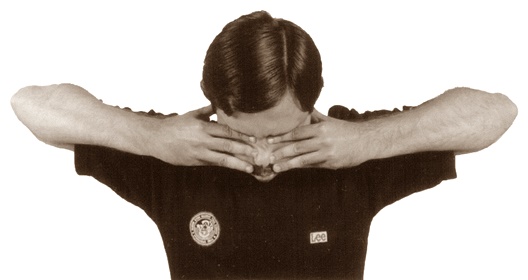
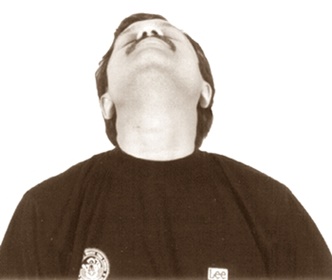
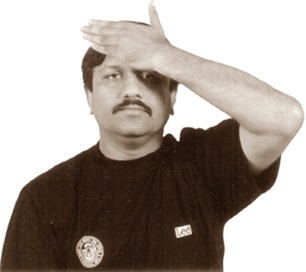
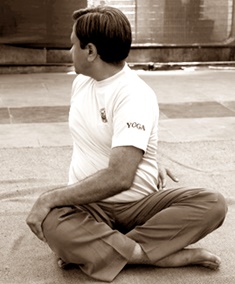
10. EXERCISES TO STRENGTHEN THE NECK:
Neck is a very important part of the body. It is the part which is used continuously for every work we do. So, proper care of the neck is very important. These days we find lot of problems related to neck. These problems are caused due to many reasons viz. wrong sitting postures, doing lot of desk work and sitting on computer systems etc. without relaxing neck. The following process must be done daily. Each exercise may be repeated 6 to 8 times. During the practice, shoulders should not move at all. Mind should be continuously focussed on the neck.
Procedure:
1) Keeping the back bone straight, breathing out turn the head towards right looking back. Breathe in while coming to normal position. Again breathing out turn the head towards left and while breathing in come back to normal position.
2) Keep the back bone straight. Breathing out bend the head forward and touch the chin to the chest. Gradually, breathing in raise the head fully upwards.
3) Breathing out tilt the head towards right shoulder. Breathing in come back to the normal position. Repeat the same on the left side.
4) Press your right cheek with your right palm. Without moving the elbow turn to right breathing out. Gradually, breathing in come to normal position. Press the left cheek with left palm and release the right palm and repeat the same on the left side.

5) Press the chin with both the palms for few seconds. Hold the breath, in this Kriya.
6) Press both the cheeks with the palms holding the breath for few seconds.

7) Press both the sides of temple with the palms holding the breath.
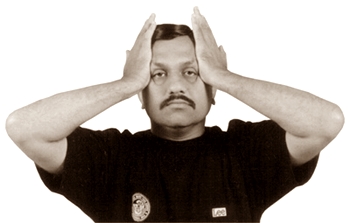
8) Press the center of the forehead with one palm. Gradually rotate it in a clockwise and anticlockwise directions.
9) Interlock the fingers at the back of the neck. Breathing out exert the pressure by bringing both the elbows together. Breathing in come to the normal position.
10) Bend the head and rotate it clockwise and anti-clockwise alternately. Repeat 4 to 6 times.
11) Rub the palms, gently massage the neck.
Advantages:
Regular practice of these Kriyas will help in preventing pains, diseases and disorders of the neck including cervical spondylitis.
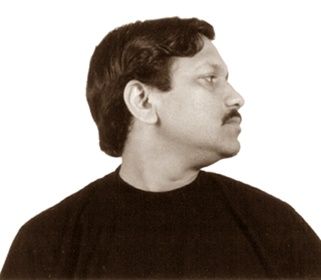
11. EXERCISES FOR THE NERVES OF THROAT :
Procedure:
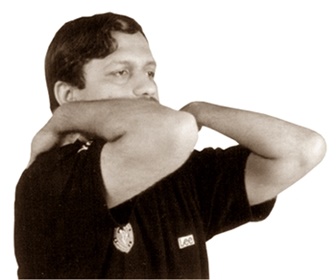
1) Keep the mouth closed. Stretch the chin and nerves of the right and left sides of the throat, creating a pressure in the nerves. Hold the position for 10 seconds. Relax by coming to normal position. Repeat 4-6 times.
2) Create pressure on the nerves of the neck by stretching them on either side. Breathe in and breathe out in quick succession for 15 to 30 seconds.
3) Rub the palms, gently massage the throat.
Advantages:
Throat nerves get strengthened and the extra fat accumulated gets reduced.These also help in free breathing and clear voice. Double chin is reduced.
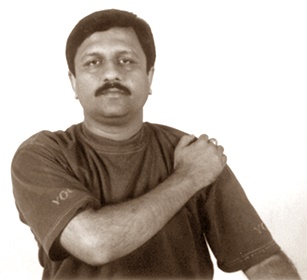
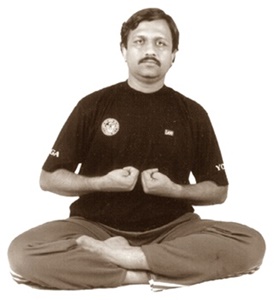
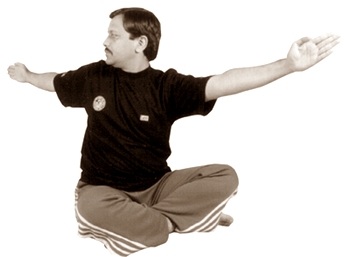
12. EXERCISES FOR ARMS:
Every Kriya should be practiced for 15 – 60 seconds repeating slowly.
1) Shoulders:
Procedure:
1) Sit in a comfortable position preferably Sukhasan. Place both the palms on the thighs. Breathe in raising the shoulders and breathe out while coming to normal down position.
2) Stretch both the elbows in front. Hold the shoulders with your fingers. Breathing in raise the elbows and breathing out lower the elbows.
3) Stretch the hands on either side. Hold the shoulders with your fingers. Breathing in raise the elbows and breathing out lower the elbows from sides.
4) Stretch the arms in front. Hold the shoulders with your fingers and join the elbows near the chest. Breathing in rotate the elbows upwards and breathing out downwards forming big circles.
5) Repeat the above Kriya, moving the shoulder in reverse direction ie. from down side.
6) Stretch the arms either sides. Hold the shoulders with your fingers. Swing the elbows up and down in quick successions. Breathe in upwards and breathe out downwards.
7) Stretch the arms on either sides. Hold the shoulders with your fingers. Swing the elbows front and back in quick successions. Breathe in backwards & breathe out frontwards.
8) Stretch the arms in front. Hold the shoulders with your fingers. Swing the elbows up and down alternately in quick succession. Breathe normally.
9) Place the palms on your knees. Rotate one shoulder in clockwise and anti-clock wise direction. The other shoulder should not move. Repeat with other shoulders. Then repeat with both together.
10) Hold right elbow with left fingers and left elbow with right fingers. Without moving the head and backbone, slowly stretch the elbows towards rightside breathing out. Breathing in come to center. Repeat on left side. Perform 4-6 times.
11) Holding the elbows as above, lift both elbows upwards breathing in and downwards breathing out.
12) Holding as above, rotate the elbows in clockwise direction 4-6 times. Repeat in anti clockwise direction also.
13) Massage your shoulders.
Advantages:
These exercises help in energising shoulder joints. It helps in curing frozen shoulders and other related problems, weight lifting capacity increases.
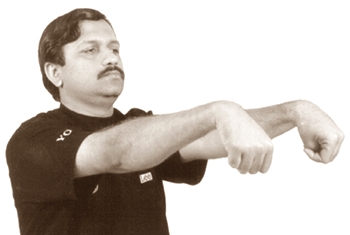
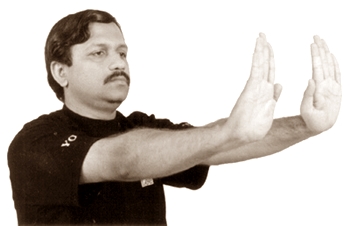
2) Elbows, Upper arms, Fore arms:
Procedure:
1) Stretch the arms in front at shoulder level. Breathing out touch the fingers to the shoulders, folding the arms at elbows with a swing. Breathing in come to normal position.
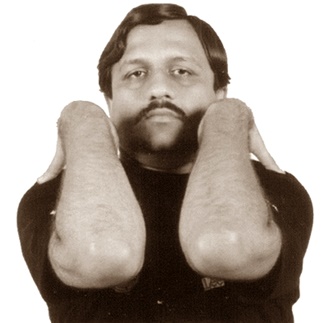
2) Stretch the arms on either side. Breathing out with a swing touch the shoulders with the fingers.Breathing in come to normal position.
3) Stretch the arms at the ground level in front. Breathing out touch the shoulders with the fingers. Breathing in come to normal position in quick succession.
4) Raise the arms. Breathing out touch the shoulders with the fingers. Breathing in come to normal position in quick successions.
5) Stretch the arms front. Folding the thumbs between the fingers form fists. Breathing out touch the shoulders with the fist. Breathing in come to position. This kriya is performed with force and in quick successions.
6) Stretch the arms on either sides. Form a fist. Breathing out touch the shoulders with the fists. Breathing in come to normal position. These kriya is also performed with force and in quick successions.
7) Stretch the arms at the ground level in front. Form a fists. Breathing out touch the shoulders with the fist. Breathing in come to normal position. Perform this kriya with force and in quick succession.
8) Raise the arms, form a fist. Breathing out touch the shoulders with the fists. Breathing in come to normal position. Practice with force and in quick succession.
9) Stretch the arms in front, form a fist. Place the elbows on the sides of your stomach with forearm in front. Breathing in with force stretch the arms in front and breathing out come to normal position in quick succession.
10) The above kriya a repeated but when the arms are stretched in front, the fists are bent in inwards direction.
11) Stretch the arms in front forming fists. One arm is stretched in front, the other moved back. The arm at the back is stretched in front and the stretched arm is taken back alternately in quick succession. Synchronise the breath with alternate arms moving front & back.
This is named as MANTHAN KRIYA and is highly beneficial for the entire front & back area, including neck, back bone, waist, chest and abdomenal human machinery. This is a MUST BE DONE Kriya for every human being.
Advantages:
Elbow joints and arms are strengthened. Problems related to elbow joints will reduce.Power is generated in upper/fore-arms.
3) Wrists:
Procedure:
1) Stretch the arms in front forming a fist. The fists are moved up and down. Then gradually rotate the fist in clock wise and anti-clock wise directions. Repeat each exercise for 1015 times.
2) Repeat as in (1) keeping the arms near the chest.
3) Stretch the arms at sides. Repeat the exercise as in (1).
4) Stretch the arms at ground level in front. Repeat the exercise as in (1).
5) Raise the arms up and repeat the exercise an in (1).
6) Fold the elbows. Place the fists at the back of the head. Repeat the exercise as in (1).
Advantages:
Wrists are strengthened. Pain in wrists is reduced. Very beneficial to sports persons, computer operators & drivers.
4) (A) Palms:
Procedure:
1) Stretch the arms in front keeping the fingers together. Move the palms up and down, right and left. Repeat each exercise for 10-15 times. Palms should be stiff and should not bend.
2) Keep the palms near the chest. Repeat exercise of (1).
3) Stretch the arms at the sides and repeat the exercise of (1).
4) Stretch the arms at the ground level in front. Repeat the exercise of (1).
5) Raise the arms up. Repeat the exercise of (1).
6) Place the palms at the back of the head. Repeat the exercise of (1).
Advantages:
Palms are strengthened and blood circulation is regulated.
4) (B) Back side of palms :
Procedure:
All the above exercise 1) to 6) are repeated by stretching the fingers apart.
7) Stretching the finger apart, in front, swing the palms quickly.
Advantages:
Back of the palms get strengthened.
5) Finger joints:
Procedure:
1) Stretch the arms in front. Loosen the hands and fingers. Freely and briskly shake them 15-20 times.
2) Repeat the exercise of (1) moving the fingers near the chest.
3) Stretch the arms at the sides. Repeat the exercise of (1).
4) Stretch the arms at the ground level in front. Repeat the exercise of (1).
5) Raise the arms up. Repeat the exercise of (1).
6) Place the fingers at the back of the head. Repeat as (1).
Advantages:
Finger joints are strengthened and problems related to finger joints are reduced. Counting and writing become easier.
6) Fingers:
Procedure:
1) Stretch the arms in front with palms facing downwards. Gradually form a fist with force and open up to normal position. Repeat the same with force and in quick successions. Each exercise should be practiced 10-15 times.
Repeat the same exercises of (1) keeping the hands:
2) Near the chest.
3) Stretching the arms at the sides.
4) Stretching the arms at the ground level on the sides .
5) Raising the arms up and
6) Leaving the arms at the back of the head.
Advantages:
When these exercises are practiced slowly the heart gets strenghtened and when done briskly fingers are strengthened and energised.
7) Finger tips:
Procedure:
1) Join the finger tips of both the hands. Exert pressure for 10-15 sec. Come to normal position. Repeat 4-6 times.
2) Stretch the arms in front with fingers apart. Breathing in move back the fingers as if pulling a heavy weight. Breathe out assuming the fingers are released from the weight on your sides. Repeat 4-6 times.

Advantages:
Finger tips are strengthened. Their sense of touch is increased.
After practicing the above exercises, move the loosened hands and fingers freely on either side. Massage the hands and fingers to relax.
13. AUTO ACUPRESSURE:
Procedure:
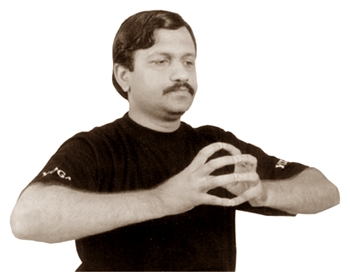
1) Interlock the fingers. Exert pressure for 10-12 seconds. Release the pressure. Repeat 4-6 times.
2) Exerting the pressure on the interlocked fingers, move them front and back.
3) Exerting the pressure move the interlocked fingers up and down.
4) Exerting the pressure move the interlocked fingers to right and left.
5) Pull the interlocked fingers alternately on the right and left side. Repeat 4-6 times.
6) Interlocking the fingers, raise the right elbow up and lower the left elbow down. Exert the pressure. Alternately the positions of the elbow are to be changed.

7) Both the palms are pressed. So, that alternately one palm is placed on the other.

Advantages:
These exercises help in creating pressure on different acu-points placed in the palms. It strengthens the entire body.
14. EXERCISES FOR CHEST, HEART AND LUNGS:
During these exercises when the chest is expanded 2-4 liters of air has to be inhaled. When the chest is brought to normal position the entire air has to be exhaled. Each exercise has to be repeated for 10-15 times.
Procedure:
1) Folding the fingers, form a fist; Both the fists are placed near the navel. Breathing in raise the fists, from the sides along with head. Breathing out come to normal position.
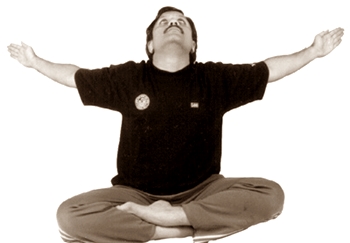
2) Stretch the arms in front. Breathing in, raise the arms form a Namsakar Posture, gradually raise the head. Breathing out come to normal position.
3) Stretch the arms in front with palms touching each other. Breathing in raise the arms at the sides. Head is also to be raised. Breathing out come to normal position.
4) Repeat the above exercise with the back of palms facing each other.
5) Stretch the arms at side. Breathing in, raise the head and arms forming a Namaskar Posture. Breathing out come to normal position.
6) Stretch the arms in front, slowly move them in clock-wise and anti-clock wise direction for 8-10 times. While raising the arms breathe in when they come to downwards position breathe out.
7) Stretch the arms at side. Breathing out, pat the back, one elbow placed on the other, Breathing in come to normal position.
8) Raise the arms from sides. Touch the left elbow with the right palm and right elbow with the left palm. Breathe in while raising the arms and breathe out while touching the elbows.
Advantages:
As sufficient air is inhaled, chest, heart and lungs are strengthened and energised. It reduces tiresomeness. Heart problems, T.B., Breast Cancer, breathing problems and other related diseases are prevented. Working stamina develops.
15. EXERCISES FOR STOMACH:
Procedure:
1) Sit comfortably in Sukhasan. Place both the hands by the side of the right knee. Breathing out, bend stomach, chest and head. Touch the chin to the right knee. Breathing in come to normal position. Repeat on the left side. Practice for 10-12 times on alternate sides.
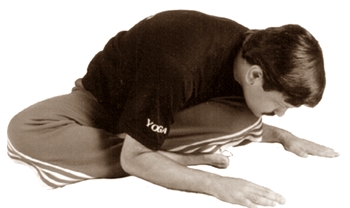
2) Sit comfortably. Place the hands at the side of knees on the floor. Breathing out, bend, stomach, chest and head forward. Touch the forehead to the ground. Breathing in come to normal position. Repeat 10-12 times.
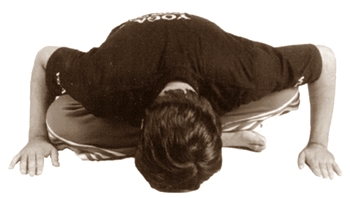
Advantages:
Navel is strengthened. Stomach related problems like potbelly, acidity, constipation and gastric problems are cured.
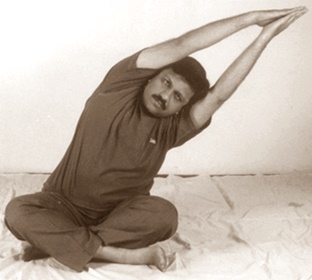
16. EXERCISES FOR THE BACK AND WAIST:
Repeat each of the following 10-15 times
Procedure:
1) Sit comfortably with hands stretched at sides. Breathing out, turn to right. Breathing in come to normal position. Repeat the left side. Practice for 10 to 15 times.
2) Sit straight hold the right knee firmly with left hand. Place the right arm on wrest. Turn the head and whole back fully rightwards breathing out. Breathing in come to center. Repeat towards leftside.
3) Sit Comfortably with both the hands raised in a Namaskar Posture. Breathing out, bend to right. Breathing in come to normal position. Again, breathing out bend towards left.
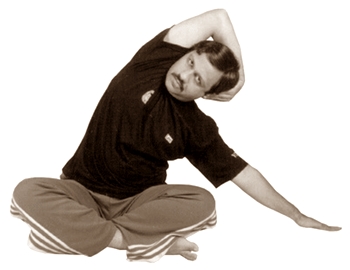
4) Stretch the arms at the side. Bending from the right, stretch the right arm further. A gap of one inch is to be maintained between the ground and the palm. Raise the left arm and touch the right ear. Alternately repeat on either sides.
5) Form fist, place the fists near the chest. Swiftly swing the body on either sides. While turning look at the back, breathing out.
Advantages:
Back bone is strengthened. Problems related to back and waist are reduced. Extra accumulated fat melts away.
![]()
After practicing all the above kriyas, gently massage eyes, face, throat, neck, hands and shoulders. Stretch the legs and also massage them. After relaxing for a while one can have a glass of water or a cup of Arogyamritam.
It will take only 20 to 30 minutes for performing the above Micro Yogic Kriyas. Do practice them regularly for better health.
![]()